Archive for April, 2024
问题概述
使用非美式键盘,使用微软内建的中文输入法,当激活拼音输入法(无论中英文模式)时,键盘布局永远是美式。结果就是输入符号时不符合键盘上的符号(甚至字母都不对,如果用的是非QWERTY的键盘布局)。
解决方案
按下Windows键(或者点击开始菜单按钮)输入 regedit,回车或者点击注册表编辑器。进入 HKEY_LOCAL_MACHINE\SYSTEM\CurrentControlSet\Control\Keyboard Layouts 然后一个一个找(可以使用方向键翻,用鼠标点可能会点疯),找到你要修改的语言,例如这里我要改的是简体中文,文件夹00000804对应的就是简体中文的键盘布局 (Layout Text 的值是 Chinese (Simplified) - US Keyboard),双击 Layout File 把值从 KBDUS.DLL 改成 KBDUK.DLL,可以顺便把 Layout Text 的值里面的 US Keyboard 改成 UK Keyboard。修改完成后需要重启电脑(或者登出再登入)生效。
PHP and SQLite: Lightweight SQL Database for PHP
In this tutorial, we will explore PHP and SQLite, a powerful combination that enables developers to create lightweight and efficient SQL databases for their PHP applications. SQLite is a serverless, self-contained database engine that is easy to set up and requires minimal configuration. By the end of this tutorial, you will have a solid understanding of how to use SQLite with PHP and will be ready to build your own database-driven applications.
Table of Contents
- Introduction to SQLite
- Installing SQLite on Your System
- Creating a SQLite Database in PHP
- Executing SQLite Queries in PHP
- Fetching Results from SQLite Queries
- Error Handling and Debugging
- Conclusion
1. Introduction to SQLite
SQLite is a lightweight, self-contained, and serverless SQL database engine that is increasingly popular for its ease of use and minimal setup requirements. Unlike other SQL databases like MySQL or PostgreSQL, SQLite does not require a separate server process to manage the database. Instead, it reads and writes directly to a single disk file.
Some of the benefits of using SQLite with PHP include:
- Serverless architecture: No need for a dedicated server process
- Portable and self-contained: No external dependencies and easy to install
- Fast and efficient: Offers good performance even for large databases
- ACID-compliant: Ensures data integrity and consistency
- Flexible and extensible: Supports user-defined functions and extensions
2. Installing SQLite on Your System
To use SQLite with PHP, you need to have the SQLite extension enabled in your PHP installation. The SQLite extension is enabled by default in PHP 5.3.0 and later versions. To check if SQLite is enabled on your system, you can use the following command:
If SQLite is not enabled, you can enable it by editing your `php.ini` file and adding the following line:
After enabling the SQLite extension, restart your web server for the changes to take effect.
3. Creating a SQLite Database in PHP
To create a new SQLite database in PHP, use the `SQLite3` class. The constructor of this class accepts a file path as a parameter, which will be used to store the database. If the file does not exist, SQLite will create it automatically. Here’s an example:
This code creates a new SQLite database named `my_database.sqlite` in the same directory as the PHP script. You can also use an in-memory database by passing `:memory:` as the file path:
4. Executing SQLite Queries in PHP
To execute an SQL query in PHP, you can use the `exec` method of the `SQLite3` class. This method takes an SQL query string as its parameter and returns `true` on success, or `false` on failure. Here’s an example of how to create a table and insert some data:
5. Fetching Results from SQLite Queries
To fetch the results of a SELECT query, you can use the `query` method of the `SQLite3` class. This method takes an SQL query string as its parameter and returns an instance of the `SQLite3Result` class, which you can use to fetch the rows of the result set. Here’s an example:
6. Error Handling and Debugging
To handle errors and debug your SQLite queries in PHP, use the `lastErrorCode` and `lastErrorMsg` methods of the `SQLite3` class. These methods return the error code and message of the last operation, respectively. Here’s an example:
Unified Write Filter.
http://woshub.com/using-unified-write-filter-uwf-windows-10/
1、UWF是一个独立的系统组件,在“控制面板”->“程序和功能”->“打开或关闭Windows功能”->“设备锁定”->“统一写入筛选器”中启用。
2、若要启用UWF,请运行此命令并重新启动计算机:uwfmgr.exe文件过滤器启用。
3、启用筛选器后,它将自动重新配置系统以消除任何写入操作(禁用了交换文件,还原点,文件索引编制,碎片整理)。
特定系统磁盘启用写保护,请运行以下命令:
uwfmgr.exe volume protect c:
现在重新启动计算机。重新启动后,用户在会话期间写入磁盘的所有内容将仅在下一次重新启动之前可用。
您可以使用以下命令检查UWF状态:
uwfmgr.exe get-config
要将特定文件或文件夹添加到排除项,请运行以下命令:
Uwfmgr.exe file add-exclusion c:\labs
Uwfmgr.exe file add-exclusion c:\labs\report.docx
要为注册表项添加排除项:
Uwfmgr.exe registry add-exclusion “HKLM\Software\My_RegKey”
在开始维护(更新安装,防病毒软件更新,复制新文件)之前,您将必须切换到特殊服务模式:
Uwfmgr.exe servicing enable
The following predefined variables are supported:
- ${userHome} – the path of the user’s home folder
- ${workspaceFolder} – the path of the folder opened in VS Code
- ${workspaceFolderBasename} – the name of the folder opened in VS Code without any slashes (/)
- ${file} – the current opened file
- ${fileWorkspaceFolder} – the current opened file’s workspace folder
- ${relativeFile} – the current opened file relative to
workspaceFolder
- ${relativeFileDirname} – the current opened file’s dirname relative to
workspaceFolder
- ${fileBasename} – the current opened file’s basename
- ${fileBasenameNoExtension} – the current opened file’s basename with no file extension
- ${fileExtname} – the current opened file’s extension
- ${fileDirname} – the current opened file’s folder path
- ${fileDirnameBasename} – the current opened file’s folder name
- ${cwd} – the task runner’s current working directory upon the startup of VS Code
- ${lineNumber} – the current selected line number in the active file
- ${selectedText} – the current selected text in the active file
- ${execPath} – the path to the running VS Code executable
- ${defaultBuildTask} – the name of the default build task
- ${pathSeparator} – the character used by the operating system to separate components in file paths
- ${/} – shorthand for ${pathSeparator}
Supposing that you have the following requirements:
- A file located at
/home/your-username/your-project/folder/file.ext opened in your editor;
- The directory
/home/your-username/your-project opened as your root workspace.
So you will have the following values for each variable:
- ${userHome} –
/home/your-username
- ${workspaceFolder} –
/home/your-username/your-project
- ${workspaceFolderBasename} –
your-project
- ${file} –
/home/your-username/your-project/folder/file.ext
- ${fileWorkspaceFolder} –
/home/your-username/your-project
- ${relativeFile} –
folder/file.ext
- ${relativeFileDirname} –
folder
- ${fileBasename} –
file.ext
- ${fileBasenameNoExtension} –
file
- ${fileDirname} –
/home/your-username/your-project/folder
- ${fileExtname} –
.ext
- ${lineNumber} – line number of the cursor
- ${selectedText} – text selected in your code editor
- ${execPath} – location of Code.exe
- ${pathSeparator} –
/ on macOS or linux, \ on Windows
Tip: Use IntelliSense inside string values for tasks.json and launch.json to get a full list of predefined variables.
By appending the root folder’s name to a variable (separated by a colon), it is possible to reach into sibling root folders of a workspace. Without the root folder name, the variable is scoped to the same folder where it is used.
For example, in a multi root workspace with folders Server and Client, a ${workspaceFolder:Client} refers to the path of the Client root.
You can also reference environment variables through the ${env:Name} syntax (for example, ${env:USERNAME}).
{
  "type": "node",
  "request": "launch",
  "name": "Launch Program",
  "program": "${workspaceFolder}/app.js",
  "cwd": "${workspaceFolder}",
  "args": ["${env:USERNAME}"]
}
You can reference VS Code settings (“configurations”) through ${config:Name} syntax (for example, ${config:editor.fontSize}).
If the predefined variables from above are not sufficient, you can use any VS Code command as a variable through the ${command:commandID} syntax.
A command variable is replaced with the (string) result from the command evaluation. The implementation of a command can range from a simple calculation with no UI, to some sophisticated functionality based on the UI features available via VS Code’s extension API. If the command returns anything other than a string, then the variable replacement will not complete. Command variables must return a string.
An example of this functionality is in VS Code’s Node.js debugger extension, which provides an interactive command extension.pickNodeProcess for selecting a single process from the list of all running Node.js processes. The command returns the process ID of the selected process. This makes it possible to use the extension.pickNodeProcess command in an Attach by Process ID launch configuration in the following way:
{
  "configurations": [
    {
      "type": "node",
      "request": "attach",
      "name": "Attach by Process ID",
      "processId": "${command:extension.pickNodeProcess}"
    }
  ]
}
When using a command variable in a launch.json configuration, the enclosing launch.json configuration is passed as an object to the command via an argument. This allows commands to know the context and parameters of the specific launch.json configuration when they are called.
Command variables are already powerful but they lack a mechanism to configure the command being run for a specific use case. For example, it is not possible to pass a prompt message or a default value to a generic “user input prompt”.
This limitation is solved with input variables which have the syntax: ${input:variableID}. The variableID refers to entries in the inputs section of launch.json and tasks.json, where additional configuration attributes are specified. Nesting of input variables is not supported.
The following example shows the overall structure of a tasks.json that makes use of input variables:
{
  "version": "2.0.0",
  "tasks": [
    {
      "label": "task name",
      "command": "${input:variableID}"
      // ...
    }
  ],
  "inputs": [
    {
      "id": "variableID",
      "type": "type of input variable"
      // type specific configuration attributes
    }
  ]
}
Currently VS Code supports three types of input variables:
- promptString: Shows an input box to get a string from the user.
- pickString: Shows a Quick Pick dropdown to let the user select from several options.
- command: Runs an arbitrary command.
Each type requires additional configuration attributes:
promptString:
- description: Shown in the quick input, provides context for the input.
- default: Default value that will be used if the user doesn’t enter something else.
- password: Set to true to input with a password prompt that will not show the typed value.
pickString:
- description: Shown in the quick pick, provides context for the input.
- options: An array of options for the user to pick from.
- default: Default value that will be used if the user doesn’t enter something else. It must be one of the option values.
An option can be a string value or an object with both a label and value. The dropdown will display label: value.
command:
- command: Command being run on variable interpolation.
- args: Optional option bag passed to the command’s implementation.
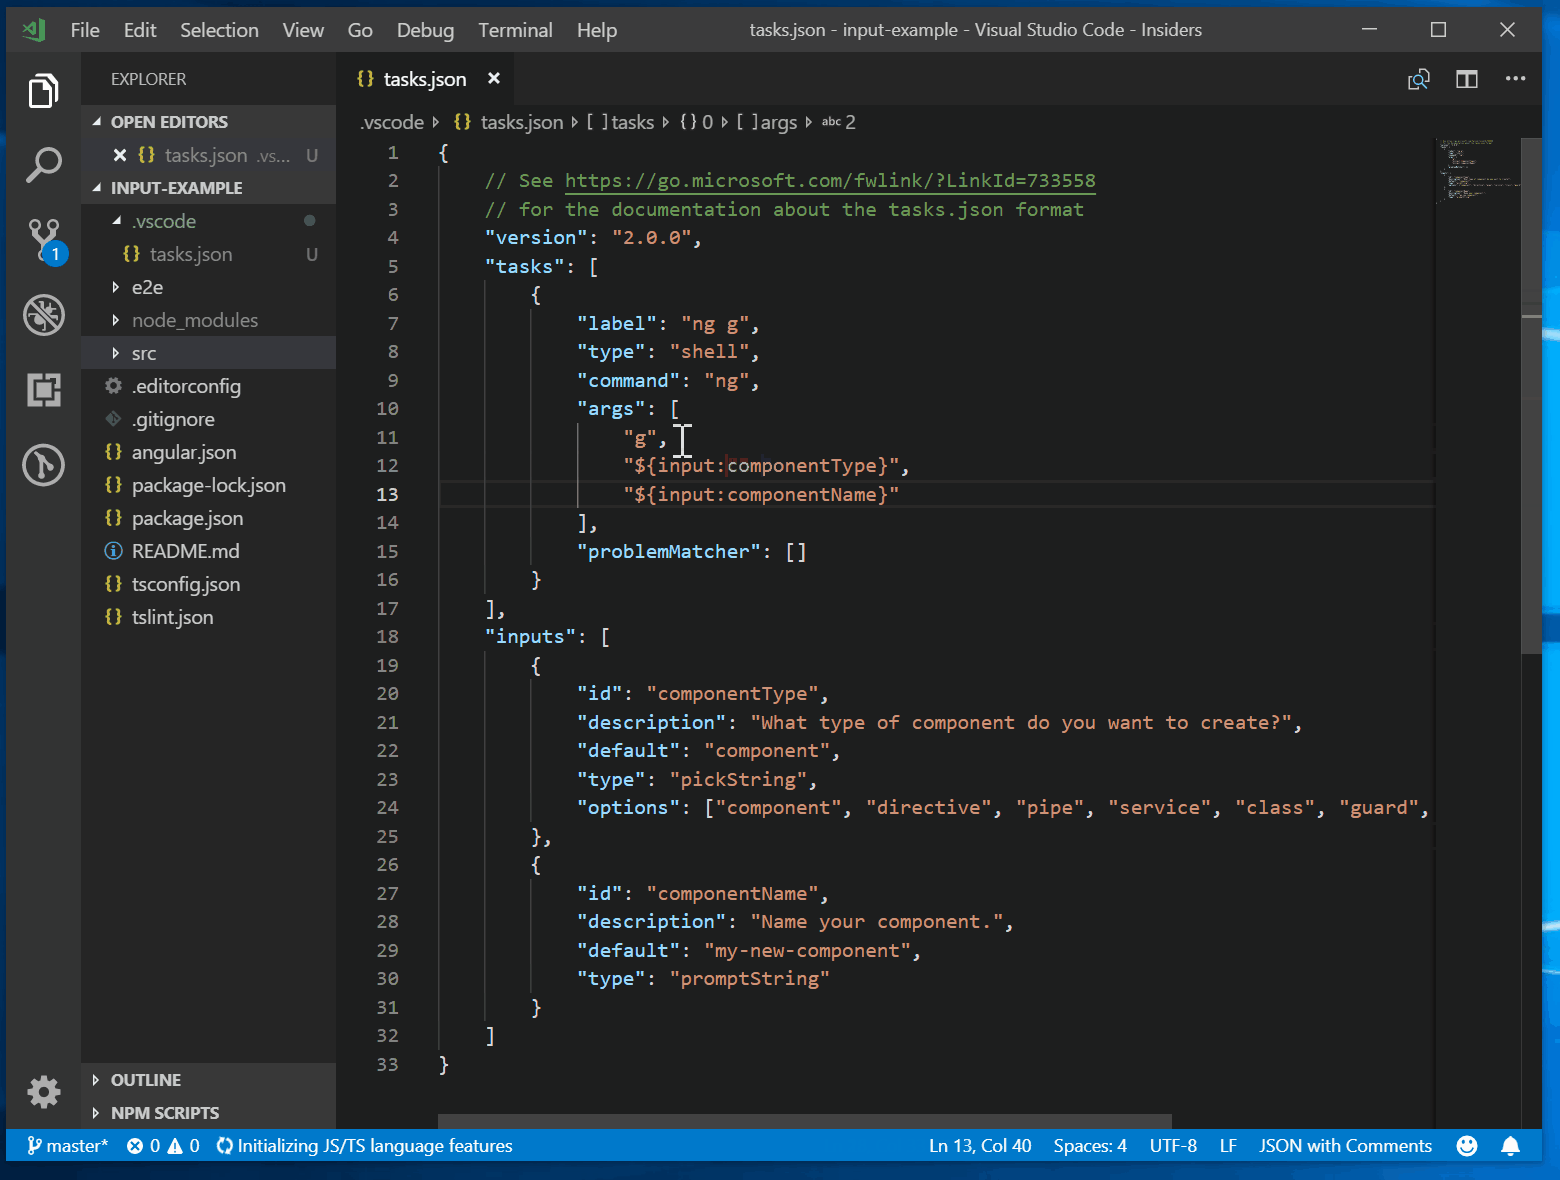
Below is an example of a tasks.json that illustrates the use of inputs using Angular CLI:
{
  "version": "2.0.0",
  "tasks": [
    {
      "label": "ng g",
      "type": "shell",
      "command": "ng",
      "args": ["g", "${input:componentType}", "${input:componentName}"]
    }
  ],
  "inputs": [
    {
      "type": "pickString",
      "id": "componentType",
      "description": "What type of component do you want to create?",
      "options": [
        "component",
        "directive",
        "pipe",
        "service",
        "class",
        "guard",
        "interface",
        "enum"
      ],
      "default": "component"
    },
    {
      "type": "promptString",
      "id": "componentName",
      "description": "Name your component.",
      "default": "my-new-component"
    }
  ]
}
Running the example:
The following example shows how to use a user input variable of type command in a debug configuration that lets the user pick a test case from a list of all test cases found in a specific folder. It is assumed that some extension provides an extension.mochaSupport.testPicker command that locates all test cases in a configurable location and shows a picker UI to pick one of them. The arguments for a command input are defined by the command itself.
{
  "configurations": [
    {
      "type": "node",
      "request": "launch",
      "name": "Run specific test",
      "program": "${workspaceFolder}/${input:pickTest}"
    }
  ],
  "inputs": [
    {
      "id": "pickTest",
      "type": "command",
      "command": "extension.mochaSupport.testPicker",
      "args": {
        "testFolder": "/out/tests"
      }
    }
  ]
}
Command inputs can also be used with tasks. In this example, the built-in Terminate Task command is used. It can accept an argument to terminate all tasks.
{
  "version": "2.0.0",
  "tasks": [
    {
      "label": "Terminate All Tasks",
      "command": "echo ${input:terminate}",
      "type": "shell",
      "problemMatcher": []
    }
  ],
  "inputs": [
    {
      "id": "terminate",
      "type": "command",
      "command": "workbench.action.tasks.terminate",
      "args": "terminateAll"
    }
  ]
}
Variable substitution in debug configurations or tasks is a two pass process:
- In the first pass, all variables are evaluated to string results. If a variable occurs more than once, it is only evaluated once.
- In the second pass, all variables are substituted with the results from the first pass.
A consequence of this is that the evaluation of a variable (for example, a command-based variable implemented in an extension) has no access to other substituted variables in the debug configuration or task. It only sees the original variables. This means that variables cannot depend on each other (which ensures isolation and makes substitution robust against evaluation order).
The predefined variables are supported in a select number of setting keys in settings.json files such as the terminal cwd, env, shell and shellArgs values. Some settings like window.title have their own variables:
"window.title": "${dirty}${activeEditorShort}${separator}${rootName}${separator}${appName}"
Refer to the comments in the Settings editor (Ctrl+,) to learn about setting specific variables.
The variable ${workspaceRoot} was deprecated in favor of ${workspaceFolder} to better align with Multi-root Workspace support.
Not all values in tasks.json support variable substitution. Specifically, only command, args, and options support variable substitution. Input variables in the inputs section will not be resolved as nesting of input variables is not supported.
One easy way to check a variable’s runtime value is to create a VS Code task to output the variable value to the console. For example, to see the resolved value for ${workspaceFolder}, you can create and run (Terminal > Run Task) the following simple ‘echo’ task in tasks.json:
{
  "version": "2.0.0",
  "tasks": [
    {
      "label": "echo",
      "type": "shell",
      "command": "echo ${workspaceFolder}"
    }
  ]
}
Windows 11版本 7条
vssadmin /?
vssadmin 1.1 – 卷影复制服务管理命令行工具
(C) 版权所有 2001-2013 Microsoft Corp.
—- 支持的命令 —-
Delete Shadows – 删除卷影副本
List Providers – 列出已注册的卷影副本提供程序
List Shadows – 列出现有卷影副本
List ShadowStorage – 列出卷影副本存储关联
List Volumes – 列出可以进行卷影副本处理的卷
List Writers – 列出订阅的卷影副本写入程序
Resize ShadowStorage – 调整卷影副本存储关联的大小 |
在 Windows 10 中,可以使用vssadmin命令行工具进行卷影副本的管理。以下是一些常用的卷影副本命令:
创建卷影副本:
vssadmin create shadow /for=<驱动器>
例如:
vssadmin create shadow /for=C:
这将在C盘上创建一个卷影副本。
删除卷影副本:
vssadmin delete shadows /for=<驱动器> [/all]
例如:
vssadmin delete shadows /for=C:
这将删除C盘上的所有卷影副本。如果要删除所有驱动器上的卷影副本,可以添加/all参数:
vssadmin delete shadows /all
列出卷影副本:
vssadmin list shadows [/for=<驱动器>]
例如:
vssadmin list shadows /for=C:
这将列出C盘上的所有卷影副本。如果要列出所有驱动器上的卷影副本,可以省略/for参数:
vssadmin list shadows
查询卷影副本提供者:
vssadmin list providers
该命令用于列出系统上安装的所有卷影副本提供者。
查询卷影副本设置:
vssadmin list shadowstorage [/for=<驱动器>]
该命令用于列出指定驱动器或所有驱动器的卷影副本存储设置,包括卷影副本的最大存储空间和当前使用的存储空间。
设置卷影副本存储空间大小:
vssadmin resize shadowstorage /for=<驱动器> /on=<驱动器> /maxsize=<大小>
该命令用于设置指定驱动器上的卷影副本存储空间的最大大小。需要指定被保护的驱动器和存储卷影副本的驱动器(可以是相同的驱动器),并指定最大大小(例如:10GB)。
显示卷影副本的属性:
vssadmin list shadows [/shadow=<卷影副本ID>]
该命令用于列出指定卷影副本或所有卷影副本的详细属性,包括卷影副本的ID、创建时间、状态等信息。
Windows Volume Shadow Copy Service(VSS)是一项重要的数据备份技术,它可以创建文件或卷的快照,即使文件正在使用中也能保证数据的一致性。VSS 通过与操作系统、存储服务以及应用程序的紧密集成,确保了备份过程的高效和准确。
在 Windows 10 系统中,VSS 相关的配置信息部分存储于注册表中。注册表中与 VSS 相关的键主要集中在以下几个位置:
- VSS 服务配置:
- 路径:
HKEY_LOCAL_MACHINE\SYSTEM\CurrentControlSet\Services\VSS
- 此处主要包含了 VSS 服务的启动类型、错误控制等基本配置信息。
- VSS 提供者:
- 路径:
HKEY_LOCAL_MACHINE\SOFTWARE\Microsoft\Windows NT\CurrentVersion\VolumeShadowCopy
- 在这个部分中包含了 VSS 的提供者信息。VSS 提供者负责创建、管理卷影副本。Windows 自带的提供者有 Microsoft Software Shadow Copy provider 1.0 等。
- VSS 编写器:
- 路径:
HKEY_LOCAL_MACHINE\SOFTWARE\Microsoft\Windows NT\CurrentVersion\VolumeShadowCopy\Writers
- VSS 编写器负责确保备份过程中数据的一致性。例如,数据库系统在进行备份时可能需要执行特定的操作以确保数据一致性。在这个部分下,会列出系统中所有注册的 VSS 编写器及其状态信息。
- VSS 诊断:
- 路径:
HKEY_LOCAL_MACHINE\SOFTWARE\Microsoft\Windows NT\CurrentVersion\VolumeShadowCopy\Diagnostics
- 这里包含了用于故障排查和性能监控的配置选项。
- VSS 客户端备份设置:
- 路径:
HKEY_LOCAL_MACHINE\SOFTWARE\Microsoft\Windows NT\CurrentVersion\VolumeShadowCopy\SnapshotSets
- 这部分记录了当前系统上的快照集合的信息,通常用于高级故障排除。
VSSAdmin(Volume Shadow Copy Service administration tool)是用于管理Windows系统卷影复制服务的命令行工具。以下是VSSAdmin命令的初级、中级和高级应用实例:
初级应用实例:
- 显示当前系统中的所有卷信息:运行以下命令可以列出当前系统中的所有卷信息:
vssadmin list volumes
中级应用实例:
高级应用实例:
这些初级、中级和高级应用实例展示了VSSAdmin命令在不同场景下的功能和用法,帮助用户更好地管理和利用Windows系统中的卷影复制服务。根据具体需求选择合适的命令和参数,可以提高系统数据备份和恢复的效率和可靠性。
VSSAdmin命令与其他多个命令组合的初级、中级和高级应用实例:
初级应用实例:
中级应用实例:
高级应用实例:
这些组合应用实例可以提高数据备份和恢复的效率,并且能够在不同场景下灵活应对数据管理需求。根据具体情况选择合适的命令组合,并确保命令的正确性和安全性,以确保数据的完整性和可靠性。
VSSAdmin命令与其他多个命令以及REG文件组合的初级、中级和高级应用实例:
初级应用实例:
中级应用实例:
高级应用实例:
这些组合应用实例结合了VSSAdmin命令、REG命令和其他文件操作命令,可以在数据备份和系统管理中发挥重要作用。根据实际需求选择合适的命令组合,并确保命令的正确性和安全性,以保护数据和系统的稳定性。
卷影副本是 Windows 操作系统中的一个功能,它可以创建系统在某个时间点的快照,以便在需要时还原文件或文件夹到该时间点的状态。在命令行下,可以使用一些命令来管理卷影副本,包括:
- vssadmin:
vssadmin 是 Windows 系统中用于管理卷影副本的主要命令。它提供了各种子命令来执行不同的操作,如创建快照、列出快照、删除快照等。以下是一些常用的 vssadmin 子命令:
vssadmin list shadows: 列出当前系统上存在的所有卷影副本。vssadmin list shadowstorage: 列出当前系统上各卷的卷影副本存储信息。vssadmin create shadow /for=<Volume>: 为指定卷创建一个卷影副本。vssadmin delete shadows /for=<Volume> [/oldest | /shadow=<ShadowID>]: 删除指定卷的卷影副本,可以选择删除最旧的或指定 ID 的快照。
- DiskShadow:
DiskShadow 是一个命令行实用程序,用于管理卷影副本。它提供了更高级的功能,可以通过脚本进行自动化管理。以下是一些常用的 DiskShadow 命令:
diskshadow /l <script.txt>: 使用脚本文件执行 DiskShadow 命令。diskshadow /s <script.txt>: 使用交互式 Shell 执行 DiskShadow 命令。ADD VOLUME <Volume>: 添加指定卷到卷影副本的作用域。CREATE: 创建卷影副本。DELETE SHADOWS: 删除卷影副本。
- PowerShell Cmdlets: PowerShell 提供了一组与卷影副本相关的 Cmdlets,可以通过 PowerShell 来管理卷影副本。一些常用的 Cmdlets 包括:
Get-WmiObject: 用于检索与 Windows 管理体系结构 (WMI) 相关的信息,可以用于获取卷影副本的信息。New-VSSSnapshot: 创建卷影副本。Remove-VSSSnapshot: 删除卷影副本。
- Shadow Copies for Shared Folders: 如果在系统上启用了共享文件夹的卷影副本功能,则可以使用一些专门用于管理共享文件夹卷影副本的命令,包括:
vssadmin add shadowstorage: 为共享文件夹指定卷添加卷影副本存储。vssadmin resize shadowstorage: 调整共享文件夹的卷影副本存储大小。vssadmin create shadow /for=<SharedFolder>: 为指定共享文件夹创建卷影副本。
- Windows Server Backup: Windows Server Backup 是 Windows Server 系统中提供的备份和恢复工具,它也可以用于管理卷影副本。通过 Windows Server Backup,管理员可以备份和还原整个卷影副本,以及配置备份策略等。
这些命令可以在管理员需要对系统中的卷影副本进行管理时使用。通过这些命令,管理员可以执行创建、列出、删除等操作,以确保卷影副本的正确管理和使用。
